Monday, May 30, 2011

Carrot Puree

 Initially going into homemade baby food I was concerned about some things that I read about nitrate exposure.  So finding this information/article on nitrate exposure made me feel a lot better.  Basically it states that food with nitrates (such as carrots and other "root" veggies) should not be prepared for a child younger then 3 months.  By the time most babies are introduced to solids the concern of nitrate exposure (which can cause infant anemia) is null and void as the child's body can digest nitrates.  Yeah!  What a relief.

So this is a simple carrot puree.  I used about 4 medium to large carrots.
Steamed them in the microwave (via Pampered Chef large steamer) with about 1/4 cup water for approximately 8 minutes until extra tender. 
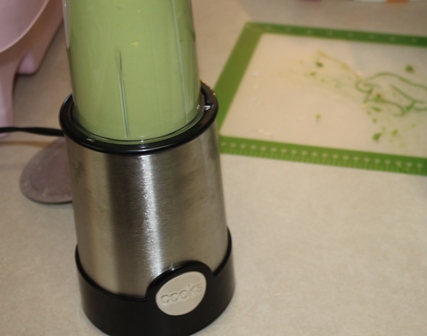
Once they were tender I placed them in my small electric blender and voila! a delicious carrot puree.  
I used my pastry bag to dispense into the ice cubes trays and into the freezer it went.

Cost:  $1.50 (estimate...I'll keep better track next time)
Servings: 1 ice cube tray (16 cube ~ 1 oz each)
Prep Time:  10-12 minutes
Notes:  Froze well just mix it back together as the water separates.

Tools: small electric blender, microwave steamer, pastry bag and ice cube trays.

Rating:
Kendall - 3 stars
Seren - 3 stars

My kiddos weren't sure on carrots the first bite or two but loved them by the end.  I am also getting a little bit of a stock pile of purees going in the freezer.  I love this!  It is as easy or easier then breaking open a baby food jar at meal time.  I have been introducing new foods at their afternoon meal (allowing time to observe any reactions) and then a bottle and some cereal for bed time.  Usually they eat one cube of food (if they like it)...so I imagine we'll be bumping them up to two cubes as they get better at eating.  By then I will probably break out the big guns (my regular blender) but for now I LOVE my mini blender.

Saturday, May 28, 2011

Green Bean Puree

I bought fresh green beans at the grocery store, however it is perfectly fine to use green beans from your freezer section as well.  Canned vegetables are not recommended.  I truthfully have never liked green beans from the freezer or can but found that I really enjoyed the fresh steamed ones from this (unfortunately "the critics" did not agree).

If you use fresh green beans snap or cut off the ends and then wash the vegetables.  Frozen can be used without trimming as this has been done during preparation.  Next get a boiler pot or microwave steamer and steam your green beans until very tender.  The water should just begin to enter the steam colander in the pot (keep an eye on your water).  I steamed mine for about 10-12 minutes.  Once they have been steamed do not drain the water (use this water to thin and smooth our your puree).  I scooped out the beans into my small power blender (again I love this) and then proceeded to puree it.  I added more water from the pot to get the right consistency.  I didn't find problems with the "skins" of the green bean but I have read that some find this an issue to smooth out. Some recommend using a seeve or strainer to separate this.  Once this has cooled slightly I added it to my pastry bag and dispensed it into ice cubes trays, setting a few ounces aside for my girls to try.

 steaming green beans
 puree - ready to eat and freeze
Kendall - glad that green beans are over
Seren - also glad to be done with them

**Based on 2nd round of making green beans**
Cost:  $2.33 for 1.17 lb
Servings:  22 ice cubes (or 22 oz)
Prep time:  15 minutes (would be less with frozen beans)
Comparison:  $.11 per ounce (vs $.13 for Beech Nut and $.16 for Gerber - based on 4 oz bottle; price increases for smaller ounce bottle)
Notes: Freezes and reheats well (so far).

Tools:  Steamer basket, boiler, small power blender, ice cube tray and pastry bag

Ratings:
Kendall - 2 stars (2nd try - 3 stars)
Seren - 2 stars (2nd try - 3 stars)

Freeze or Not to Freeze

I will definitely not claim to be an expert on this.  I have read up on it and what I've decided is that it depends on who you ask, for the most part, as to if something is able to freeze or not.  Many recommend freezing certain things, such as bananas and avacados, as halves or wholes of the fruit (not pureed or cooked).

So what I have decided to do, unless all sources I find say not to freeze, is to experiment upon it and find out what freezes well and what does not.  I will leave my findings in the notes with each preparation.

Upon freezing puree leftovers I use ice cube trays and have found these to be cheap and to work wonderfully.  I have heard that the silicone brownie pan by Wilton is also nice with uniform cubes (approx 2 oz) so I'm tempted to try this also.  I freeze my purees for probably about 12 hours and put them into a quart size freezer bag (labeled with date and expiration).  It is recommended that baby food only be left frozen up to 3 months (and probably best used before that).

Pear Puree

We had about four pears that seemed to be getting a little too ripe.  So into the pot they went and became puree for the freezer.  Peel and core the pears first and then cut into small pieces.  To help prevent browning of the fruit I splash a little lemon juice on them and then drained it out.  Some infants may have sensitivity to citrus (it isn't technically supposed to be introduced until 12 months).  I didn't find any problems with this technique and it's a very small amount of juice.  For the pears I decided to boil them (for about 8 minutes).  Once this was done I poured out most of the water.  Pears are naturally watery so there wasn't a need to add any of this water to the puree.  I then scooped the pears into my small mixer; I would recommend this over a large blender (especially if you only have one baby).  Once again I used my pastry bag to dispense the pear puree into the ice cube trays for freezing.  Four pears filled about one ice cube tray with a small amount of extra.  I put the extra into a small jar and into the fridge to see how the lemon splash prevented browning.  It did end up turning about the color of apple sauce in the fridge.  The frozen cubes stayed fairly golden.


Cost:  4 pears (approx $3)
Servings:  1 tray (16 cubes ~ 1 oz each) and 4 oz jar
Prep time: 10-15 minutes
Notes:  Splash with lemon juice and drain to prevent browning (watch for sensitivity though)

Tools:  pearing knife, boiling pot, small power blender, pastry bag and ice cube tray.

Ratings:
Kendall - 3 star
Seren - 3 star

Wednesday, May 25, 2011

Avacado Attempt

I had read that avacado was a perfectly wonderful first food to try.  I went to my local market and picked up some starter foods to prepare:  avacados, green beens, bananas and a yam (I can't find "sweet potatoes" anywhere and read yam is different but very similar...I'm hoping).

So today after nap time and close to meal time I took out the avacado and mashed it up.  I mixed in about 2 oz of formula with it at first and had the girls try it.  Seren sputtered a little so back to the kitchen I went to add more formula and mash some more.  I ended up adding about 4 oz of formula in the end.

 2nd attempt with more formula but still tiny chunks you can barely see
 What a ripe avacado should look like
 Small blender (LOVE this thing)

Tips:  They say you only need to mash this up like you would with bananas.  I found that even mashing my best left little chunks.  Kendall did okay with it but spit out the little chunks of course and I  think this is part of the reason Seren didn't like it.  I recommend pureeing (at least until your child is used to texture).  You don't need to cook it but pureeing makes it nice and smooth.

I also discovered I LOVE pastry bags for dispensing into ice cube trays.  I worried about making an all out mess pouring so I came up with the idea (at least I haven't read it anywhere else yet) to use a pastry bag.  It worked perfectly and kept everything clean. 

Cost:  1 avacados -$2  (probably should only use 1/2 of avacado for 2 servings)
Servings: 2 servings 
Prep time: 5-10 minutes
Note:  Do not freeze leftovers

The ratings:
Kendall - 4 stars
Seren - 1 star

Tools:  pampered chef masher (used - although power blender alone would have done it had I known) , small power blender (mine is by Cooks at JcPenny), pastry bag, ice cube trays (any will do; I bought mine color cordinated to what I will freeze in them - fruit, veggie and mix/meat)

The Ratings

I figure I should explain my planned rating system.  Each meal or food will be rated based on a 4 star rating:

1 star =  spitting out, fussing or crying and look of "yuck"
2 star =  spitting out or look of "yuck"
3 star =  opening mouth and pleasant look
4 star =  wide open mouth, smiling and eager to have more.

Tuesday, May 24, 2011

Different stages for same ages...

I admit I did try a little rice cereal with the girls around 4 months.  I was curious how they would handle it.  It didn't go so well.  So I decided to wait until 5 months and try again.  They did better.  Not excellent but better.  I  started again with just simple rice cereal mixed with some of their formula.  I fed them 3 or 4 ounces of formula first (they usually eat 6 oz) and then attempted to give them some cereal.  When they fussed, I gave them a little more formula and then tried again after burping.  They seemed to like it.

I have already learned that twins (from what I've read...even identical) definitely do not follow the same timeline for development.  So it wasn't a surprise to me, however, it definitely demonstrates that some are quicker than others to learn.  Seren took to cereal like it was nothing new or challenging.  She spit back minimally (until she was done with eating).  Kendall didn't seem to catch on so well.  She would take it in and spit most of it back out.  She smiled and enjoyed it but didn't seem to know what was expected.  Maybe more interesting food choices will provide more motivation to eat it.

 Seren...literally pretty clean considering
Kendall...food faced  (I spoon cleaned them both equally)

Our Critics

 I thought now would be a good time to introduce you to the critics for this blog.  My twin daughters, Kendall and Seren.  They are fraternal twins brought to you by the miracle of assisted reproductive technology (ART).  We couldn't be more lucky to have such beautiful and good kids.
Seren
Kendall 
Seren is our younger twin (by 8 minutes).  She is more social and giggly but isn't so inclined to physical activities such as tummy time and rolling over just yet (she did once on accident and it scared her into crying).  Kendall is our older twin.  She is more observant and somewhat shy.  She is more active and rolled over a month or so before Seren did and is excellent with tummy time.  She is warming up socially still.

From the beginning I have held the food I/we eat out to the girls for them to smell.  At first it was turning the noses up and seeming totally disinterested.  Now it usually comes to smelling it and sometimes opening their mouths like they want a taste.  Seren seems more inclined to salty/spicy smelling foods such as pizza and cheesy stuff and Kendall seems inclined to the sweet smells like fruit and chocolate.  We'll see if this plays out in the long run but I found it interesting.